 Member Edit by Number ( Modeling )
Tool summary :
Also see :
- Modeling (where Edit Members by Number is a tool)
- Automatically process after modeling operation ( User and Site Options > Modeling > )
- Default hide item settings (affect selection list)
- "Edit Other" on context menu (alternative to Edit Members by Number )
- Edit by Piecemark (alternative to Edit Members by Number )
- Edit by Location (alternative to Edit Members by Number )
- Select a member, right-click (Menu) , choose " Edit " (alternative to Edit Members by Number )
- Double-click on main material (alternative to Edit Members by Number )
- Search Options (alternative to Edit Members by Number )
- Editing multiple members
- Grayed out fields (indicate mixed entries or that the field is disabled)
- Multiple Object Edit Password
page 1 | contents | model > member > | model -- member | member tools
Step-by-step instructions :
Edit Members by Number displays the members whose numbers you select in the " Primary selection color " only if they are in your current view.
1 . Invoke Edit Members by Number using one (1) of the following methods in Modeling :
Method 1 : Click the Edit Members by Number icon, which is pictured above. The icon can be taken from the group named ' Model - Member ' and placed on a toolbar (classic) or the ribbon (lightning).
Method 2 : If " Modeling layout style " is ' Classic ', you can use the menu system to choose Model > Member > Edit by Member Number .
Method 3, 4 or 5 : Edit Members by Number can also be configured to be invoked using a keyboard shortcut , the context menu , or a mode . For the lightning interface, this configuration is done using Customize Interface .
Method 6 : With Member Mode mouse bindings active, hold down the Alt key and right-click ( Edit Num ).
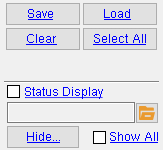
2 . A selection dialog opens. On it is a selection list of members that are referenced by their member number [in brackets] and piecemark . All members in the 3D model are listed.
|
All members in your 3D model will be shown the first time that this window is opened in a Modeling session. You can " Hide " members or set the " Status Display " to narrow the list. The next time you use this tool in the same Modeling session, the members will continue to be hidden on the list. |
Alternative 1 : If you want to edit only one member, double-click the number of that member. Go to step 3.
Alternative 2 : Select multiple members, then press " OK " to continue to step 3.
Alternative 3 : Press the " Cancel " button to end the Member by Number operation. Do not continue.
A special case: If a " Multiple Object Edit Password " has been entered and you selected multiple members, you cannot go to step 3 until you have entered that exact, case-sensitive password.
Tip: If a member is within the boundaries of your current view ( depth checking doesn't matter), it is highlighted as your mouse pointer hovers over of its listing in the selection dialog. Also, an origin symbol identifies that member's left end .
3 . Edit Members by Number opens the edit window for the type of member you selected. If you selected multiple members, the window is titled " ... Multiple Members " (e.g. Beam Edit -- Multiple Members ). If you selected multiple types of members, Edit Member by Number opens the Edit Properties window.
Tip: If you are editing a single member, the "
Summary " on a member edit window gives you a list of the member numbers of all members with the same piecemark as the member whose edit window you are on.
![]()
![]()
Alternative 1 : Edit the settings that you want to be applied to the one member or multiple members whose edit window or multi-edit window you are reviewing, then press the " OK " button at the bottom of the window. Go on to step 5 (or step 4 if it applies).
Alternative 2 : Press the " Cancel " button to end the Edit Members by Number operation without changing the one member or multiple members. Do not continue.
4 (if applicable) : Skip this step if it does not apply. If you edited a single member and more than one member has the same piecemark as that member, a yes-no dialog opens. On it is the question, "Do you want to change all members with this piecemark?"
![]()
![]()
Alternative 1 : Press the " Yes " button to apply the settings you entered in step 3 to all members with the same piecemark. Exception: If you changed the " Sequence ," that change applies to the one member only.
Alternative 2 : Press the " No " button to apply your revised settings to only the member whose edit window you were on.
5 . The mouse bindings that were active when you began this operation become active again. Please note the following:
Solids creation: If User and Site Options > Modeling > " Automatically process after modeling operation " is set to ' Process and create solids ', the edited members will automatically have solids created at the time you press " OK " to close their edit window. If that option is ' Process ' or ' Do nothing ', you will need to Process > Process and Create Solids in order to enable the display of the affected members in a solid form.
page 1 | contents | model > member > | model -- member | member tools | top